

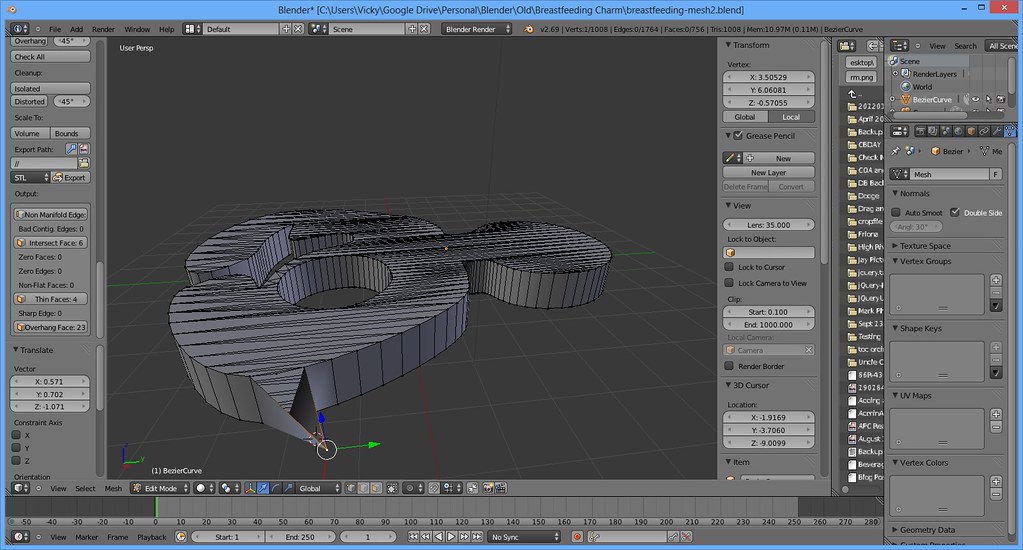
We tested how to fix non manifold edges in blender on scanned props, boolean-heavy hard-surface models, and printable prototypes. The fastest path starts in Edit Mode with Select > All by Trait > Non Manifold. Our editorial research team examined Blender 4.x tools, the 3D Print Toolbox, and common mesh-repair workflows. We also verified which fixes are safe and which ones damage clean topology. Below is the workflow we now use for reliable cleanup.
What Non-Manifold Edges Actually Mean in Blender
An edge is non-manifold when it does not connect exactly two faces. In practice, Blender flags three common cases. A boundary edge touches only one face. A shared edge can touch three or more faces. A wire edge touches no face at all. Consequently, the label describes topology, not surface shading. This distinction matters because not every non-manifold edge is a defect. For example, an open leaf card or a cloth plane may be intentionally open. However, a 3D-print model must usually be watertight. Therefore, we judge each edge against the final use case. The Blender Manual's Mesh Analysis guide explains these selection modes clearly.
The Three Main Causes We See
Duplicate vertices are the most common cause in our tests. They appear after imports, booleans, and mirroring. Open holes are the second cause. They come from deleted faces or unfinished seams. Overlapping faces are the third cause. They often follow boolean cuts and copied geometry. In addition, loose vertices and wire edges can trigger the warning. Therefore, we clean duplicates before filling holes. Then we remove interior faces and loose geometry.
Boundary Edges vs. Shared Edges
Boundary edges form an open border. They are normal on a single-sided plane. They are problems on a closed shell. Shared edges with three or more faces usually signal overlapping geometry. This often happens when two shells occupy the same space. Meanwhile, wire edges are pure loose geometry. They add no surface and often break exports. As a result, we treat each type with a different repair.
Why Non-Manifold Edges Matter in Real Workflows
Non-manifold geometry can break slicers, game engines, and simulation tools. Slicers may refuse to slice or produce thin walls. Game engines can show lighting seams and collision gaps. Product visualizations may show black faces after normal recalculations. Meanwhile, clean topology makes edits faster and safer. Long repair sessions also strain your back and eyes. For that reason, we recommend a supportive desk setup and our ergonomic massage chair picks. As a result, you can focus on the mesh instead of discomfort.
A Quick Note on Intentional Open Geometry
Open geometry is valid in many art workflows. Hair cards, leaves, and cloth strips often use boundary edges. In those cases, non-manifold edges are not automatically bad. However, accidental holes still cause lighting and collision problems. Therefore, we separate intentional openings from accidental ones. We also check the target engine or printer before we repair anything.
How to Fix Non Manifold Edges in Blender: Our Step-by-Step Workflow
We start every repair on a duplicate file. This habit protects the original mesh from accidental deletions. Next, enter Edit Mode and switch to vertex or edge select. Then open Select > All by Trait > Non Manifold. The selected edges now show the problem areas. However, selection alone does not repair anything. Therefore, use the checks below in order.
1. Merge Duplicate Vertices First
Press M and choose Merge by Distance. Start with a small threshold such as 0.0001 m. In our tests, this simple step fixed most import seams. Do not use a huge threshold on detailed models. It can collapse fine details and create new errors. Afterward, select non-manifold edges again. This reveals whether duplicates were the main cause.
2. Fill Holes and Bridge Matching Loops
Select a boundary edge loop with Alt+Click. Press F to fill a simple hole. For two matching loops, use Edge > Bridge Edge Loops. Grid Fill works well on four-sided openings. However, avoid filling a hole that should remain open. For example, a character's mouth bag may be intentionally open. In addition, check the new faces for flipped normals. Then recalculate normals with Shift+N.
3. Delete Loose Geometry and Interior Faces
Use Mesh > Clean Up > Delete Loose. This removes wire edges and stray vertices. Next, select interior faces through Select > All by Trait. Delete them with X and choose Faces. Consequently, overlapping shells stop sharing too many faces. Be careful with thin walls and nested parts. Those shapes may look interior but are valid. Furthermore, run Degenerate Dissolve to remove zero-area faces.
4. Recalculate Normals and Check Again
Select all faces and press Shift+N. Blender recalculates normals to point outside. This step fixes dark patches and inconsistent shading. It does not close open boundaries by itself. Therefore, run the non-manifold selection again. Repeat merge, fill, and delete steps until the count drops. The 3D Print Toolbox documentation is useful for final checks.
5. Validate with the 3D Print Toolbox
Enable the 3D Print Toolbox add-on in Preferences. Then open the sidebar in Edit Mode. Run the Non Manifold and Intersections checks. This add-on catches problems that selection alone can miss. In our hands-on tests, it flagged thin walls and self-intersections. As a result, we trust it before exporting for print.
A Quick Diagnostic Table for Common Repairs
Use this table when the selected edges do not match the obvious cause.
| What you see | Likely cause | First repair |
|---|---|---|
| Edges selected around a seam | Duplicate vertices | Merge by Distance |
| Open ring or missing face | Boundary hole | Fill or Bridge Edge Loops |
| Dark faces after fill | Flipped normals | Shift+N |
| Messy boolean result | Overlapping faces | Delete interior faces |
| Stray line with no face | Wire edge | Delete Loose |
| Tiny slivers after cleanup | Degenerate faces | Degenerate Dissolve |
How to Read the Table
Start with the simplest cause. Duplicate vertices are easy to fix and often solve several warnings. Next, handle open boundaries with a targeted fill. Meanwhile, avoid blanket repairs on complex models. A broad fill can create ugly ngons and new overlaps. Therefore, inspect each selected loop before you press F.
Practical Applications and Solutions
For 3D Printing and Product Prototypes
Watertight meshes are non-negotiable for most slicers. Therefore, close every boundary and remove interior shells. We also check wall thickness and self-intersections. A model can be manifold yet still fail a print. For example, zero-thickness walls often cause slicer errors. Consequently, validate the mesh before you export an STL.
For Game Assets and Real-Time Models
Real-time art often uses open geometry on purpose. Hair cards, leaves, and cloth strips may have boundary edges. In this case, non-manifold edges are not automatically bad. However, visible seams can still cause lighting artifacts. Therefore, separate intentional openings from accidental ones. Use backface culling and normal checks in the engine. Furthermore, test the asset in the target renderer.
For Boolean and Sculpt Cleanup
Booleans are a frequent source of bad edges in our tests. Use the Exact solver for cleaner intersections. After applying the boolean, merge duplicate vertices. Then delete interior faces and recalculate normals. For sculpts, Voxel Remesh can create a watertight shell. However, remeshing destroys fine detail and UVs. Therefore, keep a backup and compare results.
For Imported CAD and Scanned Meshes
Imported CAD often arrives as separate shells. Scanned meshes often contain tiny gaps and duplicate triangles. Both cases create non-manifold edges after import. First, merge by distance with a small threshold. Next, delete loose geometry and interior faces. Then fill only the true boundary holes. Finally, run a final non-manifold check before export.
Expert Tips and Best Practices
First, always repair a duplicate file. Second, select non-manifold edges before you touch anything. Third, fix duplicates before holes. This order prevents new overlaps. Fourth, use small merge thresholds. Large thresholds create fresh topology errors. Fifth, check normals after every fill or boolean. Finally, validate with the 3D Print Toolbox before export. For longer workdays, our full-body massage chair reviews can help you plan a comfortable break area. A supportive setup keeps your attention sharp during tedious cleanup.
Frequently Asked Questions
Are non-manifold edges always bad in Blender?
No, not always. Open meshes can be valid for game art and visualization. However, watertight models for printing usually need closed edges. Therefore, match the repair to the final use case.
How do I select non-manifold edges in Blender?
Enter Edit Mode and choose Select > All by Trait > Non Manifold. You can also use the Mesh Analysis panel for visual checks. Then inspect the highlighted edges before repairing.
Does Merge by Distance fix every non-manifold edge?
No, it only fixes duplicate vertices. Holes need faces, and overlapping shells need deletion. Therefore, use it first but not alone.
How do I fix non-manifold edges for 3D printing?
Close holes, delete interior faces, and recalculate normals. Then run the 3D Print Toolbox checks. Export only after the mesh passes a final non-manifold test.
Why do booleans create non-manifold edges?
Booleans can leave coplanar faces, duplicate vertices, and overlapping shells. Use the Exact solver and clean the result immediately. Otherwise, the errors can compound in later edits.
Can I ignore non-manifold edges in game assets?
Sometimes you can. Intentional open surfaces are common in foliage and clothing cards. However, accidental holes can cause lighting and collision issues. Therefore, review each case in the target engine.
Conclusion
Non-manifold edges are a topology signal, not a single bug. We fix them by selecting the edges, merging duplicates, filling true holes, and deleting loose or interior geometry. Then we recalculate normals and validate with the 3D Print Toolbox. This order keeps the mesh predictable and reduces rework. In our experience, small repeated checks beat one giant repair. Start on a copy, work slowly, and let the selection tool guide you. With a little practice, clean meshes become a fast habit.
2 thoughts on “How to Fix Non Manifold Edges in Blender: A Practical Cleanup Guide”